In this lesson, I will discuss how the .NET Garbage Collection works and how it can impact your C# programs. This is especially important for ASP.NET programmers because when you deploy an ASP.NET web application, if you don’t understand how Garbage Collection affects your program, you may end up using too many resources or memory on the web server, possibly resulting in application downtime due to server hangs or resource deadlocks. After working with .NET for many years, I noticed that there is a percentage of .NET programmers that do not understand Garbage Collection at all, and that can lead to buggy and unstable code. Even the programmers that are familiar with the concept of Garbage Collection are sometimes not knowledgeable about what Garbage Collection does NOT do, which is equally as important as what it does.
This lesson is also related to a recent article that I wrote called the Scope of C# variables. Go back and read that first if you haven’t already done so. You need to understand how C# recognizes the scope of variables in order to understand how Garbage Collection works. Also, this discussion of Garbage Collection is applicable to Reference variable types, NOT Value types. If you are not sure what the difference is, read a recent article called the Difference between Value variables and Reference variables.
Let me start off by first introducing the concept of Garbage Collection and what it is all about. Garbage Collection is a process that the .NET runtime executes every so often in order to reclaim memory that was being used by your C# program before, but is no longer being used. So in short Garbage Collection is a way that .NET cleans up old objects. By performing this cleanup, the ASP.NET runtime engine is able to effectively create memory space so that future objects can be created successfully without receiving “Out of memory” error messages. If Garbage Collection did NOT occur, your application would probably run out of memory, especially if there are a lot of users. Let’s explore more in detail below.
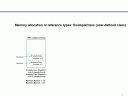
In order to understand Garbage Collection you first need to understand how .NET allocates (creates) memory in your application. When you create an instance of an object in C# (using the new operator), the .NET runtime engine will dynamically create memory for that object and then return a reference to the newly created memory. A reference is like a pointer to that new object in memory and normally you would store the reference in a variable. Here is an examle where I have created two reference variables called Number1 and Number2.
ExampleClass Number1 = new ExampleClass();
ExampleClass Number2 = new ExampleClass();
In the above example the .NET runtime will create memory for two new objects of type ExampleClass and return a reference to those objects. The references are stored in variables above using the assignment operator. Here is a graphical representation of what the .NET memory would look like after the instantiation (use of the new operator). Click to enlarge.
Now let’s say that these variables were declared inside a method like a button click event handler on an ASP.NET web form.
protected void btnReferenceVariables_Click(object sender, EventArgs e)
{

  ExampleClass Number1 = new ExampleClass();
  ExampleClass Number2 = new ExampleClass();

  Number1.Number = 11;
  Number2.Number = 22;

  txtClassNumber1Before.Text = string.Format("Number1 = {0}", Number1.Number);
  txtClassNumber2Before.Text = string.Format("Number2 = {0}", Number2.Number);

}
In this case, since the variables have a scope that is local to the method btnReferenceVariables_Click, after the method completes, they are no longer available to the application; they go out of scope. So what happens to the memory for those two objects? Well, it is still there, but the references (pointers) to it no longer exist. Here is what the memory looks like after the method completes.
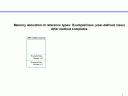
Notice that the memory is still allocated, but there are no more references to it. Is this a problem (like a memory leak)? Well, it would be a problem if Garbage Collection didn’t exist in .NET. In fact, older languages like C++ didn’t have Garbage Collection so this scenario was common when programmers forgot to deallocate memory that was created. With .NET however, what will happen is that at some point in the future (perhaps when memory is low) the .NET runtime engine will run the Garbage Collector. The Garbage Collector looks for blocks of memory like these two blocks that no longer have any references to them. The Collector then removes the unused objects from memory and this frees up more space for future object creation in your application.
Let’s review that again quickly. The Garbage Collector will run when memory is low and look for all unreferenced objects in memory. The Collector will claim back the memory used by those old objects. This is important to understand for a .NET programmer because it gives you an idea of how much memory your program is using at any given time, based on how much object instantiation you are doing. If you instantiate a lot of objects (new operator), you will be using a lot of memory. That is not necessarily a bad thing, but if you overdo it, at least you will have an idea of what you can fine tune if memory is getting too low a lot when your application runs. You can either decrease the amount of new objects that you create in your code, or you can add more memory to the machine. There are other options of course, such as using object pooling, but that is another discussion altogether. Normally the Garbage Collector will work fine to clean up your objects, even if you do a lot of instantiation. I use objects a lot in my code and I have never had any problems.
The important thing I want you to remember is that when you create an object using the new operator and your reference to that object goes out of scope, the memory doesn’t free up right away. The scope of the reference variable is very important. If a reference variable does NOT go out of scope, the reference to its object will still exist and the Garbage Collector will ignore that object. Here comes an example.
Now, let’s change the example code earlier just a little bit to see what would happen if I saved a reference to one of the objects in a Session variable. The Session is a special ASP.NET object that stores information (state) until the user logs off or closes the browser.
protected void btnReferenceVariables_Click(object sender, EventArgs e)
{

  ExampleClass Number1 = new ExampleClass();
  ExampleClass Number2 = new ExampleClass();

  Session["Number1"] = Number1;

  Number1.Number = 11;
  Number2.Number = 22;

  txtClassNumber1Before.Text = string.Format("Number1 = {0}", Number1.Number);
  txtClassNumber2Before.Text = string.Format("Number2 = {0}", Number2.Number);

}
Notice that after the objects are instantiated, I am saving a reference to the object that Number1 references in a Session variable called “Number1″. This means that after the btnReferenceVariables_Click method completes, the object that was created in the first new operation abvoe is NOT eligible for Garbage Collection. Let’s see why by looking at this graphic.
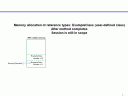
Notice that after the method completes, there is still a reference to the first object that was created. This is because although the local variables Number1 and Number2 are out of scope, the Session is STILL in scope. Therefore, the object that Number1 was pointing to is NOT eligible to be Garbage Collected. Only when the Session dies, will that object’s memory get cleaned up. Actually even if the Session hasn’t ended, there are a couple of other scenarios that would cause that object to be eligible for Garbage Collection. One way is if you assign the Session variable “Number1″ to null. The second way is if you assign the Session variable “Number1″ to a different object. In both of those cases, there wouldn’t be any more references left to that original object created by the local variable Number1 in the method, so it would then be eligible for Garbage Collection.
Now that I have covered what the Garbage Collector does, let me talk a little bit about what it DOESN’T do. This is where I have seen many programmers create buggy code because they are either unaware of the following concepts or don’t understand them well. Although the Garbage Collector will cleanup unreferenced memory, it will not cleanup unused resources that haven’t been closed or shutdown properly. Two very common examples that come to mind are file handling and database connections.
When you open a file to read or write it, the operating system creates what is called a file handle. The file handle needs to be closed properly in order to release the file back to the operating system. If a file handle is not released back gracefully, problems such as incomplete files or locked files can result. The way to prevent this is to ensure that you are properly closing the file that you open in your C# code. Most file related classes in C# have a Close() method that you can call in order to gracefully release the file and make sure that any unwritten buffered data is flushed out into the file. An example of such a class is the StreamReader class.
In a similar fashion, when you open a database connection, the database connection manager grabs available connection from the pool and gives your program a reference to that connection. The connection needs to be closed properly in order to release it back into the connection pool so that another thread can use it. If a database connection is not released gracefully, the application can run out of available connections, causing errors that could crash the entire application (especially if it is highly database driven). The way to prevent this is to ensure that you properly close opened database connections immediately after you are finished using them. The .NET database related classes have a Close() method that you can call. An example of such a class is the SqlConnection class. Make sure that you read the specific documentation for whatever class you intend to use and look at multiple examples that show how to properly close the database resources.
There is an alternative to manually closing a resource. C# contains a special statement called the “using” statement. “using” is a special keyword that can help you cleanup resources automatically so that you don’t have to call any Close() method manually. It works really well and can be used in most situations. I recommend it because it will cause the .NET runtime engine to automatically call the Dispose() method of your resource class and then Dispose() internally calls the Close() method to gracefully finish using a resource.
There are other resources (not just files and database connections) that the Garbage Collector will not automatically cleanup for you. These are called unmanaged resources in the .NET documentation. It is not possible to list them all here, but instead you should be aware of how the Garbage Collector works and read the documentation for whatever resources you are using in your application to ensure that you are properly closing them if they are unmanaged.
I hope you enjoyed this lesson and please post questions as I’m sure you will have some.
When you are coding in C#, there may be many times where you give a name to a class or a method and you decide later that you want to change that name. This is especially true for objects that have a default name like the “_Default” class that is autogenerated for the Default.aspx web form when you create a brand new web site in Visual Web Developer. In this lesson I will cover an easy way to rename a class or a method and have the Visual Web Developer IDE handle changing the name throughout the entire program automatically for me.
In order to rename a class and have the IDE change all the code in the program that references the old name to refer to the new name, I can use the refactor feature. It is very easy to use and is accessible by right clicking over the object that you want to rename. When you right click over a class name for example, you then choose Refactor->Rename. A rename popup dialog box will appear. Type in the new name for the class and click “Preview reference changes”. Preview is a good idea because it will give you an idea of how many lines of code in your program the IDE will automatically update for you with the new name of the class. Click OK and the Preview Changes window will appear showing you all the places that will be changed in the program. Click Apply to perform the refactoring. You can use this feature with method names and variable names as well.
It is important to use this refactor feature rather than just change the name of the objects manually yourself, because if you make manual changes, you may not realize how many places in your program are referencing the object being renamed. Click here to see an example video where I change the name of a class using the refactor feature of Visual Web Developer.
Click here to download the source code for this lesson.
In this lesson I am going to cover how to create properties in a C# class. This lesson is very important because it comes in handy a lot in C# programming, especially with database programming. You can think of a class property as like a variable or an option of the class. Take a look at the following syntax that shows an example of how to refer to a class property in some code.
AccessorMethods accessortest = new AccessorMethods();

accessortest.Total = 55;
In the above example I am instantiating an instance of the class AccessorMethods. Then I refer to a property of that class called “Total” in an assignment statement where I give it the value 55. Properties contain special methods called getters and setters (because you get the value of a variable or set the value of a variable). In the above example, I am using the setter because I am setting the value of the Total property. Formally the getter and settor methods are referred to as accessor methods in C#.
Now let’s look at how you can code class properties. I have a class called AccessorMethods that contains two instance variables:
int mTotal;
string mCustomerName;
These two variables are not accessible from outside the class because they are not declared as public. This adheres to the Object-Oriented design best practices of data hiding and encapsulation. There are situations however when you need to allow the caller of a class to be able to set the value of some instance variables for convenience. This can be accomplished through properties. If I want the caller of my AccessorMethods class to be able to get and set the value of the mTotal variable, I can declare a property like this:
public int Total
{
 get { return mTotal; }
 set { mTotal = value; }
}
Look strange, doesn’t it? It is actually not so bad once you understand what is going on. On the first line is the declaration of the property name, which is “Total” in this case. Notice that the property name is NOT the same as the instance variable name (mTotal). I had to declare the property as public so that a caller can access it. I also had to define what type the property will return from its getter method, which is “int” in this case. The return type of the property (Total) must match the type of the instance variable (mTotal). The rest of the property is contained within curly braces.
Underneath the curly brace is the get (getter) property method. This is the method that will be called when a caller tries to read the property. In the example, the value of the variable mTotal will be returned.
On the next line is the set (setter) property method. This is the method that will be called when a caller tries to change the value of the property (write). This line contains a special keyword called “value”. “value” is a dynamic variable that will get populated at runtime during an assignment statement. In the first code example at the beginning of this lesson there was a line where I called the setter method:
//set { mTotal = value; }

accessortest.Total = 55;
At runtime the variable “value” in the setter method will get replaced with 55 and the instance variable mTotal will be assigned 55. See how that works? Not so bad huh! Now let’s take a look at the property code for the other instance variable in my class: mCustomerName.
public string CustomerName
{
 get { return mCustomerName; }
 set { mCustomerName = value; }
}
It looks similar to the Total property but there is a difference. Since mCustomerName is a string type, I had to change the return type for the CustomerName property to string. Here is an example of how I can call the setter property for CustomerName.
AccessorMethods accessortest = new AccessorMethods();

accessortest.CustomerName = "Ted";
To use the getter property methods the syntax is the same as the setter method, except it is used in a read operation instead of an assignment operation:
lblOutput.Text = string.Format("Total = {0}. CustomerName = {1}.",
 accessortest.Total,
 accessortest.CustomerName);
Since the syntax for property definitions looks very similar no matter what the underlying instance variable actually is, you can use the following template and just re-use the template for all of your programs:
public int MyProperty {
 get {return mClassVariable;}
 set { mClassVariable = value; }
}
You have to replace three things in the template to fit your scenario. First change the return type int to the type of your variable. Then change the name of the property from MyProperty to whatever you would like to call your property. Finally you change the name mClassVariable to the name of your instance variable. You can copy and paste this template as needed in your programs.
Click here to watch an example video where I create some class properties and then use them in a calling program.
Click here to download the source code for this lesson.
In this lesson, I will cover what the difference is between C# value variables (types) and C# reference variables (types). It is especially important that you understand how reference types work because if you master how to use them properly, you can improve your programming skills and become good at Object-Oriented programming.
Let me first say that if you find this lesson confusing or don’t understand everything at first, go back and read it again either right away or after a short break. I find that most students new to Object-Oriented programming and C#, find this particular lesson and the material a bit puzzling at first. If that is you, don’t worry because you are not alone and you will do fine once you practice the concepts taught in here a little bit on your own.
In C#, you can think of Value variables (sometimes called value types) as the built-in types that the language offers. These are int, bool, decimal, long, etc. These types of variables directly contain a value once you perform an assignment operation. Here is an example of a Value variable declaration and assignment.
int Number1 = 11;
Reference variables (sometimes called reference types) are a little bit different. They are not built-in simple types, but are either .NET Framework defined or User defined classes. Reference variables are essentially pointers to objects that were created in the .NET runtime memory. Reference variables do NOT directly contain a value, they are merely pointers to objects that can contain values. Here is an example of a Reference variable declaration and assignment for a user-defined class called ExampleClass.
ExampleClass Number1 = new ExampleClass();
Number1.Number = 11;
Notice that the “new” keyword is used for the Reference variable declaration. This is required with Reference variables. The C# “new” keyword tells .NET to allocate enough memory to hold an ExampleClass object and then the assignment operator returns a pointer (or reference) to the new memory location and it gets placed in the variable Number1.
Let’s explore this a bit further with a more in depth example. A technique that I like to use in order to demonstrate how Value types are different from Reference types is to show the behavior of the copy operation (assignment operator). When you assign one Value variable to another Value variable, data is actually copied from one variable to the other. The original source variable value is left untouched. I created a diagram to demonstrate this (click to enlarge).
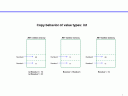
In the example diagram, two Value variables are declared. Then Number2 is assigned to Number1, so Number2 gets a copy of the value in Number1. Therefore if Number2 is modified to 33, Number1 remains unchanged.
With Reference variables, if you assign one to another, nothing is copied, but instead the destination variable simply gets a pointer (or reference) to the object that the source variable points to. See the demonstration diagram.
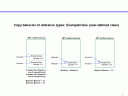
In the example diagram, two Reference variables are declared. Then Number2 is assigned to Number1, but Number2 does NOT get a copy of Number1. Number2 gets a reference to whatever Number1 is pointing to. When Number2 is modified, it affects Number1 also, because they are both referencing the SAME ExampleClass object in memory. I usually see some funny faces on my students in the classroom right about now. When Number2 is assigned a value of 33, the number that Number1 is referencing is also changed since it is the same object. Let’s explore these concepts with some more code that matches the diagrams above.
I created an example method to demonstrate the C# behavior of Value variables.
int Number1 = 11;
int Number2 = 22;

//A copy of the value in Number1 is put in Number2
//during the assignment operation.
Number2 = Number1;
//The value in Number2 is changed.
Number2 = 33;
Even though Number2 was modified to 33, it did NOT affect the value of Number1 and you can see that if you run the example code files that are part of this lesson.
Now with Reference variables it is a bit different.
ExampleClass Number1 = new ExampleClass();
ExampleClass Number2 = new ExampleClass();
//The variables are initialized by putting values
//after the assignment operator.
Number1.Number = 11;
Number2.Number = 22;

//A reference (pointer) to Number1 is put in Number2
//during the assignment operation.
Number2 = Number1;
//Now both variables Number1 and Number2 both reference
//or point to the same object.

//The value in Number2 is changed.  Since both variables
//reference the same object, Number1 is modified as well.
Number2.Number = 33;
When Number2 was modified, it also modified Number1 since after the assignment operation, they both reference the same ExampleClass object. If you run the example code files, you will see that Number1 is also 33 after the line Number2.Number = 33. Go back and look at the diagram above again. You will notice that originally Number2 pointed to its own ExampleClass object and there was a separate place in memory for that. However, after Number1 was assigned to Number2, the memory space that Number2 was originally pointing to is no longer there and Number2 points to the same place that Number1 points to. The object that Number2 was originally pointing to is no longer being referenced and it is essentially gone forever. This important to understand because it will help you understand the behavior of C# programs, especially when objects that are not built-in types are being used.
Let’s talk for a second about common places where you have to pay special attention to reference variables: loops. If you declare a reference type in a loop in C# and each time you use the “new” keyword in each loop iteration, you are creating a new place in memory each time the loop iterates and any references to the old objects in memory are lost. Take a look at the following code.
for(int i=1; i<=2; i++)
{
    ExampleClass myclass = new ExampleClass();
    myclass.Number = i;
}
In the loop, every time it iterates, a brand new ExampleClass object will be created and any reference to the object created in the prior iteration of the loop is lost. Now why am I covering this you may ask, since it is similar to how Value variables work in a loop? Well I want you to understand that using Reference variables in a loop with the “new” keyword will create a new place in memory every time and there is a way to keep all the references to each new ExampleClass object every time it is created. The way to do this is by using an Array or other list type to store all of the references created in the loop. Take a look at this.
ExampleClass[] classarray = new ExampleClass[2];
for (int i = 1; i <= 2; i++)
{
    ExampleClass myclass = new ExampleClass();
    myclass.Number = i;
    classarray[i - 1] = myclass;
}
I declared an array of type ExampleClass. Then during each iteration of the loop, I saved a reference to the ExampleClass object being created into the array. After the loop finishes, I still have a reference to all of the ExampleClass objects that were created. This technique of storing the pointers (or references) to objects can be used to help make your programs more Object-Oriented since you will be encouraged to create more User-defined classes.
One last thing I want to cover before I closeout this lesson is regarding the “string” variable type. Technically, Microsoft defines string variables as Reference types. However their behavior is similar to Value types when the assignment operator is used. When you assign one string variable to another string variable, it creates a new memory space for the destination variable and the value from the source is copied. This is in contrast to what we witnessed with other Reference types in this lesson.
I recommend that after downloading the source code for this lesson that you play around and experiment with your own Value and Reference variables to reinforce what we covered here. Go back to the diagrams if necessary to help you picture what is going on in the C# code.
Click here to download the source code for this lesson. Please note that in this zip file the example code is in the file VariableScope.cs.
In this lesson, I will talk about C# variable scope. Whenever you declare a variable in a C# program, it will always have a scope. The scope of a variable controls where you can and cannot reference that variable in the program. You might have heard the expression “a variable is out of scope” before. That means that you are trying to use a variable outside of its legal scope and the C# compiler will not allow that. I will show you examples of that below.
Let’s start by looking at some example code for a class that I created. The class is called VariableScope and is in the file VariableScope.cs. In the following class, I am declaring four different variables and each one of them has a different scope which I will explain further below.
public class VariableScope
{
    int mTotal = 0;

    public void IncrementTotal()
    {
        mTotal++;
    }

    public int GetTemperature()
    {
        int iCurrentTemp = 33;

        return iCurrentTemp;
    }

    public void PerformUpdate()
    {
        for (int i = 0; i < 5; i++)
        {
            string loopvar = "Local to the loop";
        }

        if (1 == 1)
        {
            int ifvar = 55;
        }

    }
}
The first variable that I declared is “mTotal”. This variable is declared at the class level. A class level variable can essentially be used anywhere within its containing class. These types of variable declarations essentially create global variables within a class. That means that every method of the class can reference and access this type of variable. A class level variable’s scope is the entire class. A class level variable goes out of scope whenever its containing class is no longer being referenced, so in other words whenever the class is finished being used. I cannot reference the variable “mTotal” anywhere outside the class. So if I had code in a different class that uses this class VariableScope, I would not be able to refer to the variable mTotal.
The second variable is “iCurrentTemp”. This variable is declared inside a method and its scope is local to the method within which it was declared. This means that iCurrentTemp cannot be referenced in any other method of the class.
The third variable is “loopvar”. This variable is local to the for loop that I declared it in. As soon as the loop finishes, I cannot use that variable any more.
The fourth variable is “ifvar”. This variable is local to the if statement that I declared it in. As soon as the if statement finishes, I cannot use that variable any more.
You may have noticed a pattern here. In order to determine the scope of a variable, look at where it is declared and then go up and look at where the first open curly brace { is. The first place where you find the curly brace, will tell you where the scope of the variable begins. For example look at the variable iCurrentTemp. If you look to see where the first curly brace is, you will find that it is at the beginning of the method GetTemperature. That means that the scope of iCurrentTemp is at the method level.
Every variable in a C# program will eventually go out of scope, so it is important to notice what the scope of a variable is when you are writing code and make sure you choose the right scope. Here are some guidelines.
- If you need a variable that can easily share data across various methods of the class, declare a class level variable.
- If you a variable that will help a class maintain state, declare a class level variable.
- If you need a variable that you only need for a specific purpose and don’t need to share it between methods, declare a method level variable. *Keep in mind that method level variables can actually be shared between methods by passing them as parameters, but that requires more coding. So if you have a variable that is passed around a lot as a parameter, you should consider making that variable a class level variable.
- If you need a variable for just a very short time and for a very specific purpose, consider declaring it inside a loop or an if statement, or any other C# statement. These are block level variables because they are only valid within a block of code.
Another thing I wanted to mention before I talk about the video is that sometimes I notice certain students who are new to the C# language get confused about variables with the same name, but that are actually declared in different contexts or blocks of code. For example, take a look at the variable iCurrentTemp. If I created another method and declared another variable called iCurrentTemp, those would be two completely different variables with no relationship at all.
public int GetTemperature()
    {
        int iCurrentTemp = 33;

        return iCurrentTemp;
    }

public int GetTemperatureCelsius()
    {
        int iCurrentTemp = 17;

        return iCurrentTemp;
    }
The variable name iCurrentTemp is used two times above, but the two variables are completely different. Each one has a method level scope and they are local to their containing methods. If you change iCurrentTemp in GetTemperature, it will not affect iCurrentTemp in GetTemperatureCelsius.
Watch the following video to see how I attempt to use all of the variables talked about in this lesson. You will notice that I am able to use the class level variable mTotal anywhere inside the class. For the other three variables however, when I try to use them outside of their scope, I receive a compiler error message.
This video shows me experimenting with variable scope and shows that I am unable to reference variables when they are out of scope.
Don’t forget what I mentioned about the curly braces and finding the open curly brace above a variable declaration to determine its scope. A variable is only alive while it is still in scope. When a variable goes out of scope, it can no longer be referenced or used at all and is essentially gone to the program.
Click here to download the source code for this lesson. When you open the project files, set Customer_List.aspx as the Start Page.
In this previous lesson, I demonstrated how to use the ASP.NET FormView to display data from the database in some TextBox controls with one line of C# code. In this lesson I am going to show you how to update a database table with values from TextBox controls using the FormView and SqlDataSource controls. Just like in the other examples with the FormView and SqlDataSource, you don’t have to write much database integration code and in some cases, no database code at all. This helps to reduce redundant work in your ASP.NET programs.
For this example I am going to keep using a web form named Customer_Edit.aspx which has three TextBox controls: first name, last name and e-mail address. This web form is designed to allow the user to edit information about a customer and then save the information back to the database. For this lesson, I will focus on how to save the edited customer’s information to the database. The data is stored in a database table named “customer”.
The first thing I had to do is to setup my SqlDataSource so that it knows what database command to run when an Update command occurs. I set the UpdateQuery to the following value: “UPDATE customer set first_name = @first_name, last_name = @last_name, email_address = @email_address where customer_id = @customer_id”. Notice that I am using named @ parameter variables for all of the columns. This means that the value for these variables is going to be determined at execution time by ASP.NET. In this example the value for the variables is going to come from the TextBox controls because each one of the TextBox controls has something similar to this: Text=’<%# Bind(”first_name”) %>’, which binds the TextBox to the variable first_name in the SqlDataSource.
The value for the variable @customer_id comes from a special property of the FormView control. I had to add a property named “DataKeyNames”. This property tells the FormView which database column is the unique key for the Select, Insert, Update and Delete operations that can occur. In my example I set this property to DataKeyNames=”customer_id” since the customer_id column is the unique indentifier that I used for my Select and Update operations on the customer table.
Next, I set another special property of the FormView control: OnItemUpdated=”FormView1_Updated”. OnItemUpdated tells the FormView what event method to call in your source code when an Update operation occurs. The reason that I added this in my example is because I want to redirect to another web page when the Update operation completes.
Next, I added a Save Button control inside the EditItemTemplate, just below all of the TextBox controls. I set a special property of the button: CommandName=”Update”. The CommandName property in this example tells the FormView to execute the UpdateQuery in the underlying SqlDataSource when the button is clicked.
Finally, there is one last thing that I had to do in order to complete this lesson. I had to add code for the FormView1_Updated method so that ASP.NET will call it when the Update operation completes:
protected void FormView1_Updated(Object sender, FormViewUpdatedEventArgs e)
    {
        Response.Redirect("Customer_List.aspx");
    }
Notice that I didn’t have to add any C# code to make the database Update operation work.
Click here to watch an example video where I Update database data based on TextBox control values using the FormView and SqlDataSource controls.
In case you missed or didn’t understand some of the things in this lesson, don’t worry, there was a lot to learn here. Go back to the previous two lessons and read them again along with this one. Watch the videos again as well a couple of times so that you become familiar with these techniques and then experiment with them on your own.
Click here to download the source code for this lesson. When you open the project files, set Customer_List.aspx as the Start Page.
In this lesson, I am going to demonstrate how to use the ASP.NET FormView to display data from the database in some TextBox controls with one line of C# code. This is a very useful technique because it reduces the amount of redundant database integration code that you have to write in your ASP.NET applications, especially for such a common scenario like taking data from the database and putting it into some TextBox controls.
For this example I am going to setup a web form named Customer_Edit.aspx which has three TextBox controls: first name, last name and e-mail address. This web form is designed to allow the user to edit information about a customer and then save the information back to the database. For this lesson, I will focus on how to retrieve the customer’s information from the database and display it in the web form. In the next lesson, I will build on this example web form and show you how to save the information back to the database using an SQL Update.
The web form Customer_Edit.aspx needs to know which customer to retrieve the data for. I am passing the unique customerid (a number) to the web form by using a QueryString from another web form like this: “Customer_Edit.aspx?customerid=35″. Notice that I passed the unique customerid of 35. The Customer_Edit.aspx web form will need to query the database for the customer that has that customerid. The data is stored in a database table named “customer”.
Before I get started with the technical walkthrough in this lesson, I want to explain a little bit about the ASP.NET controls that I am going to use. There are three of them. The first one is the TextBox control, which you are probably already familiar with. A TextBox displays information in an editable box so that the user can change the information. The second one is the FormView control. A FormView is used when you want to integrate your visual controls (in this example the TextBox) with a database and don’t want to write much code. In some cases, you don’t have to write any code at all when using a FormView. In this example, I only had to write one line of C# code to integrate my TextBox controls with some database data. The FormView controls the logic of retrieving the database data and placing it in the TextBox controls. Of course in order for that to work, you have to do some configuration of the FormView. You can think of the FormView as an intermediary between your visual ASP.NET controls and the database.
The third and final control that I use is the SqlDataSource control. I introduced this control in some previous lessons, but just in case you are not familiar with it, the SqlDataSource is what actually queries the database. This is another tool that helps minimize how much redundant C# code that you have to write. In the early versions of ASP.NET, these controls didn’t exist yet, and you had to write code to retrieve data from the database and put it into some visual ASP.NET controls.
The technique of taking the database data and putting it into some visual ASP.NET controls without writing any code is called data “binding”. When you bind a TextBox to a database column, you are essentially telling ASP.NET that you want to link that TextBox with a specific data value from the database. You will see how data binding works below.
Okay, lets get to the technical part and see how to integrate all of these ASP.NET server controls. The first thing that I did was to setup my Customer_Edit.aspx web form just like a regular form so I dragged three Label and three TextBox controls onto the designer and then set some of the properties. I also added some validation controls to make sure that the user enters good data. The important thing to note here is that I setup my web form just like any other regular web form, nothing special yet.
Next, I dragged an SqlDataSource control onto my web form and set the ConnectionString and SelectQuery properties. The SelectQuery specifies the actual SQL statement that will execute to retrieve the database data. I used the following SelectQuery: “select * from customer where customer_id = @customer_id”. Notice that I am using a named parameter @customer_id. The value for this parameter will get filled in dynamically at execution time. In my example, I set it up to get the value from the QueryString variable “customerid”. Just like I mentioned earlier, this will come from the URL that was used to bring up this web form “Customer_Edit.aspx?customerid=35″. Notice that the database query that I used will return one record from the database because the customer_id value in the customer table is unique for each customer.
Once the SqlDataSource was setup, then I needed a way to take the columns of the query and bind them to my TextBox controls so that they will display the database data. This is where the FormView control is used. I dragged a FormView control (found in the Data controls) from the toolbox onto my web form just underneath my TextBox controls. Then I set the DataSource ID property of the FormView to “UpdateDataSource”, which is the ID of the SqlDataSource control that I placed on the form earlier. This step links the FormView with the database query.
Before I go any further, I want to briefly talk about the three different modes of the FormView server control: ReadOnly mode, Insert mode and Edit mode. ReadOnly mode means that there won’t be any modification to the data source. The data will just be displayed and the user cannot make edits. ReadOnly mode is the default mode when you use a FormView. Insert mode allows the user to add a new record to the data source. This will most likely be linked to a database Insert query. Edit mode allows the user to edit an existing record in the data source. This is most likely linked to a database Update query. In this lesson I am going to use Edit mode of the FormView. This is because in the next lesson I show an example of how to Update a database record by using the FormView control.
Let’s get back to the lesson. Next I switched to Source view of the web form. In Source view I moved the TextBox and Label controls inside the FormView tag. Then I added a special ASP.NET tag inside the FormView tag and around the TextBox and Label controls: the <EditItemTemplate> tag. This special tag is used with the FormView tag to link the the TextBox controls with a database update command. When you put controls inside the EditItemTemplate you are telling ASP.NET what your web form will look like when the FormView is in Edit mode. Here is an excerpt from the source code for this lesson:
<asp:FormView ID="FormView1" runat="server"
 DataSourceID="UpdateDataSource" OnItemUpdated="FormView1_Updated"
 DataKeyNames="customer_id">
<EditItemTemplate>
<asp:Label ID="Label1" runat="server"
 Text="First Name:"></asp:Label>
Now to bind the TextBox controls to the database record I had to use the following property value in my first name TextBox: Text=’<%# Bind(”first_name”) %>’.
<asp:TextBox ID="txtFirstName" runat="server"
MaxLength="50"
Text='<%# Bind("first_name") %>'></asp:TextBox>
That links (binds) the TextBox to the database column first_name. Remember that I am querying the database table customer and that table contains the columns first_name, last_name and email_address. I also did a similar binding for the other two TextBox controls.
As a final step and in order to get everything working correctly I had to make sure that when my web form comes up, the FormView is in Edit mode, not in ReadOnly mode. Again, this is because I want the user to be able to edit the values in the TextBox controls and save the information back to the database. In order to put the FormView in Edit mode, I added one line of code to the Page_Load method of the web form:
FormView1.DefaultMode = FormViewMode.Edit;
Alternatively, you can also do this by setting the DefaultMode property in the aspx page. Click on the FormView, in the Properties window, scroll to the Behavior properties and set the DefaultMode drop down box to Edit.
Click here to watch an example video where I bind database data to TextBox controls using the FormView and SqlDataSource controls.
Stay tuned for the next lesson, where I will build on what we discussed here and cover how to save the edits that the user makes back to the database using the FormView and SqlDataSource controls.
Click here to download the source code for this lesson. When you open the project files, set Customer_List.aspx as the Start Page.
In this lesson, I am going to demonstrate how to use the ASP.NET GridView to display data from the database and create a dynamic hyperlink in each row of the grid. When the user clicks on a hyperlink in one of the rows, the application will go to another web page and pass some information over.
In my example GridView, I am showing a list of customers and I want the user to be able to edit the information about each customer. Each row of my GridView contains the first name and last name of a customer. I would like to add another column to the GridView that is a hyperlink and displays the text “Edit”. Then when the user clicks on Edit, the application should take them to another web form where they can edit the customer’s information. In this scenario I have two web forms:
Customer_List.aspx - Displays the list of customers from the database. Contains a hyperlink that when clicked will go to the web form Customer_Edit.aspx.
Customer_Edit.aspx - Allows the user to edit information about a specific customer.
So how can this be accomplished? We first there has to be a mechanism to transfer the user from the first page to the second page. That can be done by using a HyperLinkField column in the GridView on the Customer_List.aspx web form. A HyperLinkField column in a GridView is basically a web hyperlink, just like you see on any Internet web pages. In HTML terms it produces an anchor tag. We also need a way to pass information to the edit web form so that it knows what customer’s information can be edited. This can be accomplished by using a QueryString. A QueryString is basically variables that can be passed from one web page to another in the URL. In order to pass information to the Customer_Edit.aspx page I can use a QueryString like this:
Customer_Edit.aspx?customerid=4
Notice the ? question mark and following that the name of my variable “customerid” with a value of 4. The Customer_Edit.aspx can read the QueryString and determine that it needs to display information about the customer who’s customerid value is 4.
Now let’s take a look at what is involved to actually do this with the GridView. If you have a GridView on your web form, put your cursor over it and click on the little arrow button that appears next to the GridView. This will bring up the Tasks window. In the Tasks window, click Edit Columns and the fields window will appear. When that comes up, click on HyperLinkField and then Add. Click on the newly added HyperLinkField in the Selected fields list. Set the Text property to “Edit”. Set the DataNavigateUrlFields property to “customer_id”. Finally set the DataNavigateUrlFormatString to “Customer_Edit.aspx?customerid={0}”. Now let me explain what these properties mean.
Both of these properties help to create a dynamic hyperlink in the GridView. The DataNavigateUrlFields property specifies which field values from the database you are going to use in the dynamic hyperlink. You can specify multiple fields, separated by comma. In my example, there is only one: customer_id.
The DataNavigateUrlFormatString property specifies the dynamic URL of the hyperlink. It is dynamic because you can reference fields from the database. Fields are dynamically referenced by using the curly braces { }. Inside the curly braces you have to put the field number that corresponds to the DataNavigateUrlFields property. When you only have one field, like in my situation, the only number that is available is {0}. If I had a second field in the DataNavigateUrlFields property (e.g. customer_id, last_name), then I could reference it by using {1} which would get the last_name. For a third it would be {2} and so on. Notice that just like in the C# language, indexes begin with 0 (i.e. they are zero-based).
Now that I setup these properties, when I run the application, the GridView will create a hyperlink with the URL “Customer_Edit.aspx?customerid=” for every row. Each hyperlink will have a value of the customerid variable that corresponds to that row.
Click here to watch an example video where I setup the dynamic data bound HyperLinkField in a GridView .
Author: Ted Kolovos
Website: Amazing ASP.NET -
Click here to download the source code for this lesson. When you open the project files, set CreateCustomerRecord.aspx as the Start Page.
In this lesson, I am going to show you how to Insert data into a database table with values from TextBox controls using the FormView and SqlDataSource controls.
Typically in web applications, you encounter scenarios where you need to gather information from the user and create a record in a database table based on the what was entered. A common example of this is a registration form that a lot of websites have you fill out in order to become a member of their site. You may enter your personal information such as your last name, first name, etc. and the registration application will capture that information in a database table in order to create an account for you. In this example I am going to capture three pieces of personal information about the user as a demonstration: first name, last name and e-mail address. I am going to Insert that information into a database table named “customer”.
I created a new web form named CreateCustomerRecord.aspx. This form contains 3 TextBox controls at the top to capture the user’s information mentioned above. At the bottom of the form I placed a Save Button which will execute the database Insert statement and create the record in the database. Once the Insert operation completes, the application will automatically redirect to a home page.
Now the fun part. Here is a technical step by step explanation of what I did to make it all work using the ASP.NET FormView and SqlDataSource controls.
First I placed a FormView control on the web form and then put an InsertItemTemplate inside it. I set the DefaultMode property of the FormView to “Insert”.
Next I put the three TextBox controls and the Save button inside the InsertItemTemplate. The TextBox controls need to have data bindings so I put the Bind() expression in the Text property of each TextBox control. Here is what the first name TextBox looks like with the data binding:
<asp:TextBox ID="txtFirstName" runat="server"
  MaxLength="50"
  Text='<%# Bind("first_name") %>'>
</asp:TextBox>
You can see that the txtFirstName TextBox is bound to a data field named “first_name”. The other two text boxes are bound similarly to their corresponding data fields.
I’m almost done setting up the FormView, but there are a couple of things left to configure. Next I set the CommandName property of the Save button to “Insert”.
<asp:Button ID="btnCreateRecord" runat="server" Text="Save"
CommandName="Insert" />
I also created a FormView event named “FormView1_Inserted” that will execute after the FormView has completed Inserting the new database record. Inside that even handler I put one line of C# code to redirect the application to “home.aspx” (a sample home page).
That takes care of the FormView, now it’s time to setup the SqlDataSource control that is responsible for actually performing the database table Insert operation.
I placed an SqlDataSource control on the form and set some of the properties. The first property that I set is the InsertQuery property. This property specifies what SQL statement you want the ASP.NET engine to execute when an Insert operation occurs. In the SqlDataSource InsertQuery property, when you click on the … ellipses button, a popup window will appear. I placed the following SQL Insert statement into the popup window:
INSERT into customer (first_name, last_name, email_address) values (@first_name, @last_name, @email_address)
Notice that I placed an @ symbol in front of the field names in the values clause. The @ means that those are named parameter variables. In other words, they are going to be dynamically filled in at runtime and I don’t have to hard code them. When finished, I clicked OK to close the popup window.
Next I set the ConnectionString property of the SqlDataSource control. This is important so that the control knows what database to connect to in order to execute any SQL statements. That pretty much does it for the SqlDataSource control configuration.
Now there is one more thing left to do in order to link the FormView control with the SqlDataSource control so that when the user clicks on the Save button, the SqlDataSource will take over. I set the DataSourceID property of the FormView to the control ID of the SqlDataSource control. My SqlDataSource has a control ID of “InsertDataSource”. So I set the FormView property as DataSourceID=”InsertDataSource”. This associates the two controls with one another so that they can communicate with each other.
That is pretty much it. Not too bad huh?. Download the source code and experiment with the project yourself.
Click here to watch an example video where I walk through the entire process of setting up the FormView and the SqlDataSource to use the values from TextBox controls and perform the database Insert.
Shoppingcart_csharpuniversity is my new example web site that I developed using Visual Web Developer to showcase a lot of the powerful features of the ASP.NET 3.5 framework and C#. This is a fully functioning shopping cart web application with a SQL Server back-end. The entire source code is available for purchase and download. Once you get it, you can play around with the code or just look at it to learn how I did it. Help yourself improve your knowledge of ASP.NET 3.5 and C#, click here to learn more.
|
|
|
|


